How to Install Cloud.Typography Fonts on a Squarespace Website
It is possible to use Hoefler & Co fonts on your Squarespace website via the Cloud.Typography system. But with (understandably) no Squarespace-specific instructions on the Hoefler or Squarespace websites, it's not necessarily completely obvious what to do.
The process is fiddly, so prepare yourself for some frustration, followed by a sense of achievement you want to tell someone about. Here are step-by-step instructions for using Cloud.Typography with Squarespace…
First, Try the Fonts Out in Development Mode
Once you've chosen your fonts and paid for your Cloud.Typography license or licenses, you need to create a ‘project' for your website.
A project defines the fonts and domains for a specific site. Here are the Cloud.Typography instructions for how to create a project. Don't forget to add your Squarespace free domain (i.e., BLA-BLA-BLA.squarespace.com).
Once you've created a project, paste its CSS Key into Settings > Advanced > Code Injection > Header

(To find the CSS Key, go to your Cloud Dashboard, click on your project, then click the Tools cog on the right-hand side.)
Next, tell your website which font and variation to use for each text style (p, H1, H2 etc) in Design > Custom CSS
The CSS code for each font variation can be found under Font styles. Click the little arrow next to the name of the font to open up the full list:
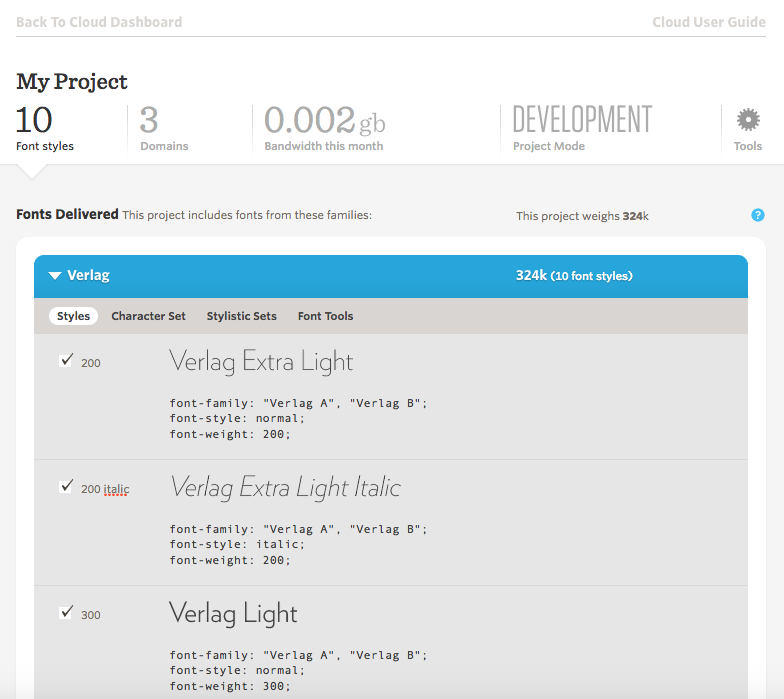
Using Verlag font as an example, your CSS code will look something like this:
h1, h2, h3 {
    font-family: "Verlag A", "Verlag B" !important;
font-style: normal !important;
font-weight: 700 !important;
  }

p {
    font-family: "Verlag A", "Verlag B" !important;
font-style: normal !important;
font-weight: 400 !important;
  }


To define any other styles, find out their names by right-clicking directly on the text and selecting ‘Inspect Element'. The code will tell you the name of the text style, which you can then define in Custom CSS.
For example, the following CSS code defines the font variation for a banner title in the Bedford template:
  .desc-wrapper strong {font-family: "Verlag A", "Verlag B" !important;
font-style: normal !important;
font-weight: 300 !important;}
You should now be able to see your pretty new lettering on your website. If you can't, add a comment below and I'll try to help.
Go Live in Production Mode
You're only allowed a limited number of page views in Development Mode. If you want your website visitors to see your site in all its glory you have to move to Production Mode. Here are the Cloud.Typography instructions for moving to production.
In Production Mode you host the font files yourself. Cloud.Typography's advice is to download the font zip file and add it to a publicly accessible web folder, but you can't access Squarespace web folders. So what can you do?
Hoefler kindly suggested I use a cloud-based service like Amazon Web Services (AWS) to host the font file. The cost for this is somewhere between free and hardly anything. Here's what to do...
Store the Font File in a Public Folder in AWS
Create an Amazon Web Services account. (By the way, I found it so difficult to prove I'm not a robot that I started to wonder if I actually was one. But I got there in the end.)
Log in to AWS. You should now see a huge list of possible use cases (if you don't, click Services at the top of the page).
Under Storage, click S3. This is where you're going to store your files.
Click + Create Bucket. A bucket is a kind of folder; a place for your font files to live. It needs a completely unique name, so use your main domain name (dots and dashes are ok) or something else that's unlikely to be in use already.
Add the name and select your nearest region, then click Next.
At the next step, change nothing (unless you know what you're doing) and click Next.
At the next step, under Manage Public Permissions select Grant public read access to this bucket.
Click Next, then click Create Bucket.
You've got a publicly-accessible bucket, now you need an object (a folder full of font files) to put in it. In your Cloud Dashboard, click on the name of the project, then click on DEVELOPMENT. Click Publish this project to your server.
Next, Cloud.Typography requests the URL of the place you're going to keep the font files. Your bucket's URL varies depending on the region you chose in AWS when you set it up. For example if you chose London, like me, the URL you should add to Cloud.Typography is:
https://YOURBUCKETNAME.s3-eu-west-2.amazonaws.com/
If you're in a different region, add your complete bucket name to the above URL, then paste it into your browser. You'll get a handy message telling you which URL you should've used.
Once you've got the right URL (test it in your browser to make sure), add it to your Cloud Dashboard and generate the Webfont Archive. Download the archive and unzip it.
Back to the S3 area of AWS:
Click on your bucket and select Upload.
Drag the entire unzipped folder of font files from Finder into the Upload window and click Next.
Select Manage Public Permissions and check all the boxes that say Read. Click Next.
Change none of the properties (unless you know what you're doing) and click Next.
Click Upload.
Go back to your Cloud Dashboard and click Confirm Your Installation.
When you get the Success message (good luck!), click on Make This A Production Project.
Test your domains. You may now find that the fonts no longer display on the Squarespace domain, but they show just fine on your other domains.
Now switch your computer off and give yourself a hug.
A Note About These Instructions...
I wrote this page back in the good old days of April 2017. I'll try to keep them up to date, but if you notice either system has changed, please let me know in the comments. Thanks!

A Squarespace website designer based in Oxford, UK, I'm on a mission to turn uninspiring, unloved websites into interesting, relevant experiences that show instantly what you offer and why people need you in their lives. More info.